Today we are going to talk all things fitting for the Lora dress. The fitted nature of the Lora means that you really do want to spend more attention to get it right. With other patterns there is often more wiggle room so you might not need to grade between sizes, do an FBA, make a muslin etc... The Lora dress is not this way. You will have some moments during construction that you can stop and make fit adjustments, but any adjustments you can make ahead of time will pay off. This is especially true of the bodice. I highly recommend doing a muslin of the bodice. It's pretty hard to adjust it after cutting and getting a good fit on the bodice really makes this dress sing.
OK, now that I have sung the praises of making a muslin, lets get talking specifics.
CHOOSING A SIZE
Most of my patterns have some ease in them so there is my leeway when choosing a size. For the Lora dress, if you are are between sizes, definitely size up. You can definitely take it in a bit if needed, but you are more likely to find it too tight than too loose.
BUST ADJUSTMENTS
What is a Bust Adjustment
Our patterns are drafted for a C-cup (0-18 size range) or a D-cup (14-32 size range). These are sewing cup sizes and not ready-to-wear cup sizes. This is very important. A sewing cup size refers to the difference between your upper bust and full bust and not your bra size. The Lora dress has both of these measurements on it's size chart so it should be pretty clear to figure out if a bust adjustment is a good option for you. To figure out your sewing cup size, subtract your high bust from your full bust, and use the difference to compare to the following chart.
- 1″ = A cup.
- 2″ = B cup.
- 3″ = C cup.
- 4″ = D cup.
- 5″ = DD cup.
- 6″ = DDD cup
If your bust difference is more than the cup your size range is drafted for ,you may want to do a Full Bust Adjustment. So for instance, if my upper bust is 29" and my full bust is 33", that is a difference of 4" or a sewing D cup. Since the 0-18 size range is drafted for a 3" difference, I would choose the size that corresponds with my upper bust measurement of 29" which is a size 0, and then do a 1" (0.5" each side) full bust adjustment to the size 0 bodice to get me a full bust of 33".
Conversely, if your bust difference is less than the cup your size range is drafted for you may want to do a Small Bust Adjustment. So for instance, if my upper bust is 29" and my full bust is 31", that is a difference of 2" or a sewing B cup. Since the 0-18 size range is drafted for a 3" difference, I would choose the size that corresponds with my upper bust measurement of 29" which is a size 0, and then do a 1" (0.5" each side) small bust adjustment to the size 0 bodice to get me a full bust of 31".
I will be showing you how to do both of these below. But first, read through the next couple of paragraphs to make sure you need to do an adjustment.
Don't Rush into a Bust Adjustment
The first thing I want to say is not to rush into doing a bust adjustment. We found through testing that the underbust gathers were much more forgiving than a dart. This is especially true of lighter weight fabrics. If your measurements are close to the chart or slightly under, you may be able to simply adjust the bodice at the side seam or adjust the length of the bodice and get the fit you want. Once again, I recommend doing a muslin of the bodice first to see if this is necessary.
Undergarments Matter
The second thing I want to point out is that undergarments (or the lack thereof) matter. With our models we found a complete cup size difference depending on which bra they wore. Make sure you are wearing the bra you intend to wear with the dress when taking measurements and making fit decisions. It makes a huge difference.
How to do a Small Bust Adjustment
If you have decided to do a small bust adjustment, you can follow the following steps, plugging in your own measurements instead.
For this tutorial I am using the following measurements:
Upper bust : 29" / Full Bust : 31" (Difference of 2" or a sewing B cup)
Since the 0-18 size range is drafted for a 3" difference, I chose the size that corresponds with my upper bust measurement of 29" which is a size 0, and then am going to do a 1" (0.5" each side) small bust adjustment to the size 0 bodice to get me a full bust of 31".
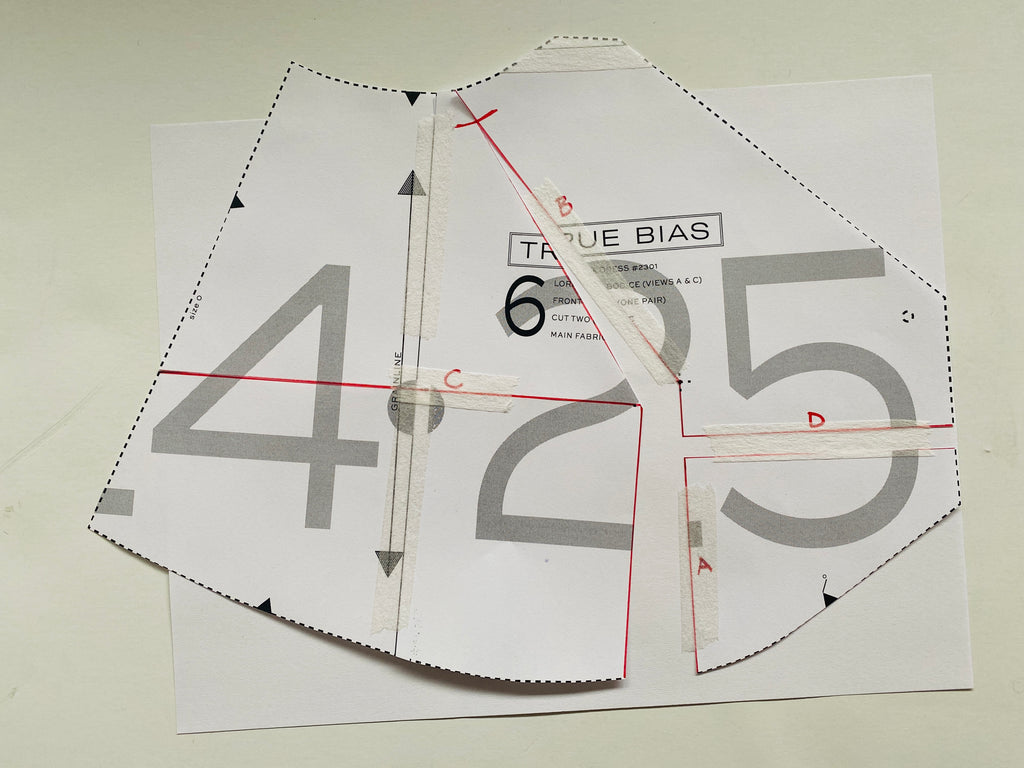
Start with your Front Bodice Pattern Piece (not the bodice lining) (I am using the bodice for Views A/C, but this process is the same for all views).
Note that the bust point is marked on the pattern piece. You may want to compare this to your body and see if you want to adjust the bust point placement. This is a very individual thing and circumstances such as breastfeeding, age and undergarments all play a role.
Make the following lines (marked in red) :
A - Vertical line from bust point to bottom of bodice, parallel to grainline.
B - Angled line from bust point to approximate middle of underarm.
C - Horizontal line from side seam to bust point, perpendicular to grainline.
D - Horizontal line, perpendicular to grainline, from center front to line A, about 1" down from the bust point.

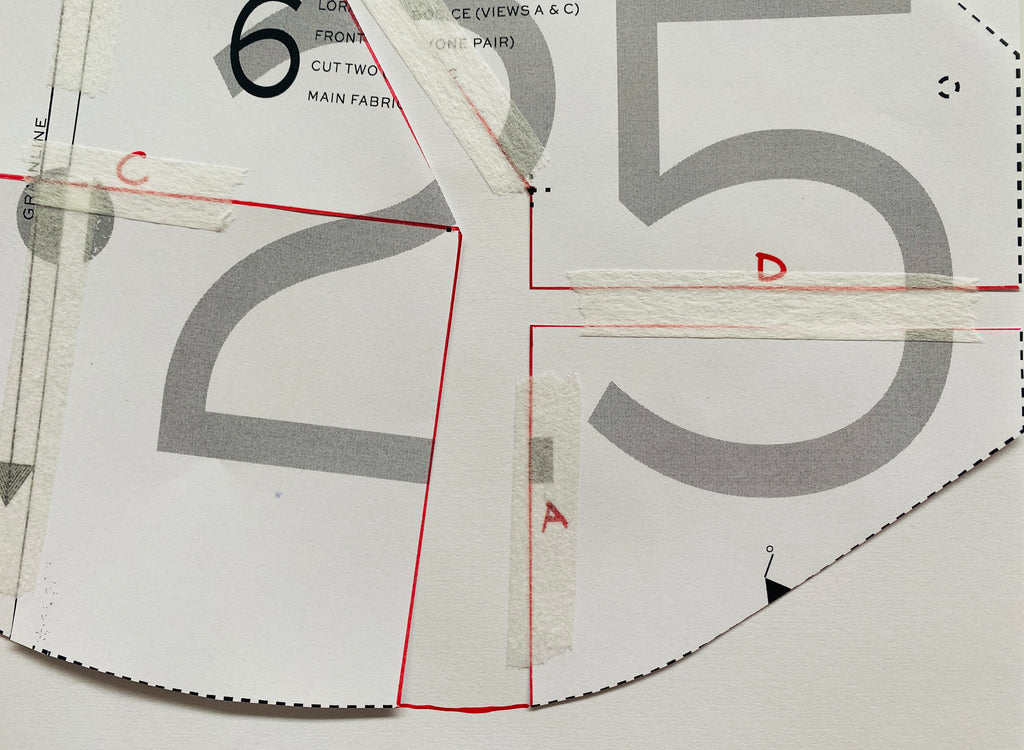
Next, mark your armhole seam allowance (1/2") along the top of line B. Make a cut from the bottom of line A to the bust point, and continue cutting up thru line B until you reach the seam allowance. Cut the rest of line B on the other side of the seam allowance leaving a small hinge.
Make another cut along line C, ending right before the bust point to leave a small hinge.

Create line E. This line is parallel to line A and the same length. The distance between line A and E is the full amount you are trying to decrease from your full bust (for me this is 1") divided by 2 since this is one side of your bust. So I am marking line E 1/2" in towards center front from line A.

 Using the hinges you made, swing the left cut edge of line A over to line E. This will raise the bust point and shorten the bodice. Tape along lines C, B and E.

You will notice that the center front is a bit too long for the left side of the bodice. Cut line D (you may need to untape it a bit first). Move the bottom center front section straight up so that the bottom of the left side is in line with the right side.

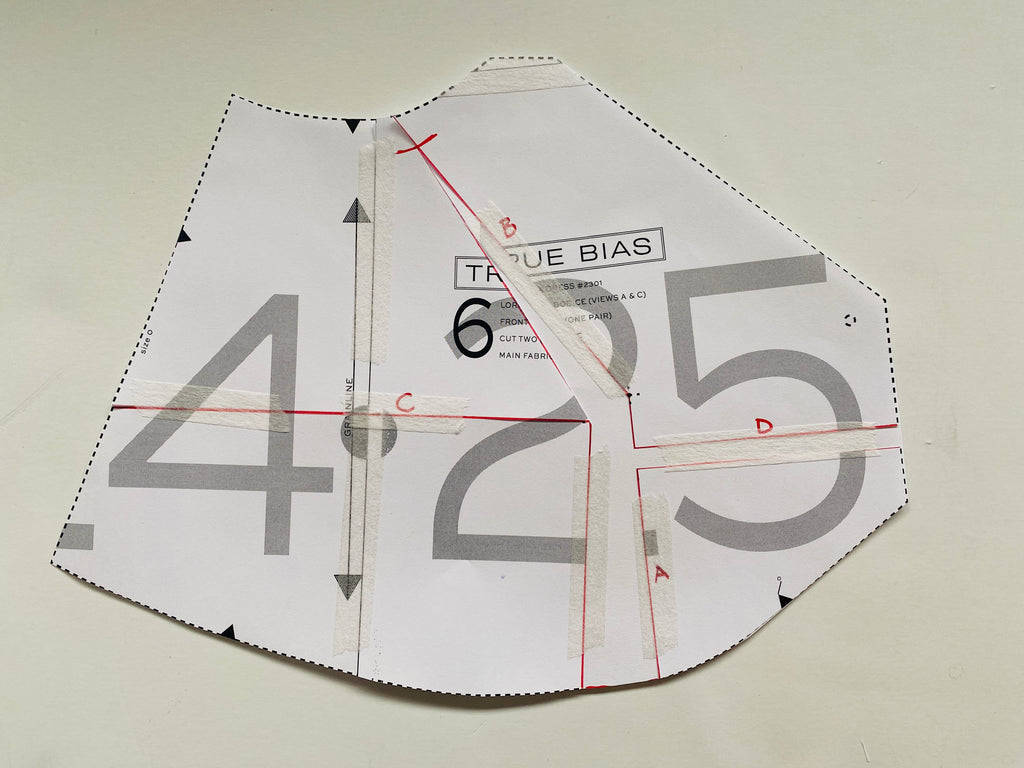
 Almost done. The last thing we need to do is adjust the side seam. It's crooked and now shorter than the back bodice.
First straighten the side seam and transfer the notch if necessary.
 Lastly, add back in any side seam length you lost and connect it back with the curved bottom of the bodice. You can use you back bodice pattern pieces to compare the length and match it up.

Depending on how much you took out for your bust adjustment, you may have some distortion along the underarm or bottom seams. Smooth out whatever needs it.
Before you cut fabric make sure to do the same adjustment to the bodice lining and bodice interfacing pieces as you did for the main bodice.
How to do a Full Bust Adjustment
If you have decided to do a full bust adjustment, you can follow the following steps, plugging in your own measurements instead.
For this tutorial I am using the following measurements:
Upper bust : 29" / Full Bust : 33" (Difference of 4" or a sewing D cup)
Since the 0-18 size range is drafted for a 3" difference, I chose the size that corresponds with my upper bust measurement of 29" which is a size 0, and then am going to do a 1" (0.5" each side) full bust adjustment to the size 0 bodice to get me a full bust of 33".
Start with your Front Bodice Pattern Piece (not the bodice lining) (I am using the bodice for Views A/C, but this process is the same for all views).
Note that the bust point is marked on the pattern piece. You may want to compare this to your body and see if you want to adjust the bust point placement. This is a very individual thing and circumstances such as breastfeeding, age and undergarments all play a role.
Make the following lines (marked in red) :
A - Vertical line from bust point to bottom of bodice, parallel to grainline.
B - Angled line from bust point to approximate middle of underarm.
C - Horizontal line from side seam to bust point, perpendicular to grainline.
D - Horizontal line, perpendicular to grainline, from center front to line A, about 1" down from the bust point.
Next, mark your seam allowance (1/2") along the top of line B. Make a cut from the bottom of line A to the bust point, and continue cutting up thru line B until you reach the seam allowance. Cut the rest of line B on the other side of the seam allowance leaving a small hinge.
Make another cut along line C, ending right before the bust point to leave a small hinge.
Place the bodice on top of a blank piece of paper. Tape the bodice to the paper along line B on the right side. Hinge the left side so the opening between line A is the full amount you are trying to increase your full bust (for me this is 1") divided by 2 since this is one side of your bust. So I am placing the two sides of line A 1/2" apart, perpendicular to one another. Tape the left side of line B in place and temporarily tape the left side of line A.


Untape the left side of line A and close up line C. Tape line C once closed.
 Now you want to connect the bottom of the bodice between the two sides of line A.
Trim off any extra paper.
Depending on how much you added for your bust adjustment, you may have some distortion along the underarm or bottom seams. Smooth out whatever needs it.
Before you cut fabric make sure to do the same adjustment to the bodice lining and bodice interfacing pieces as you did for the main bodice.
Lengthen / Shortening Your Lora Dress
The Lora is drafted for a model who is approximately 5'5" tall. All bodies are different so keep your own proportions in mind when making adjustments. If you do want to add or subtract length you can do so on the specified markings on the pattern pieces. I usually recommend dividing up the amount between multiple markings for the best result. Because the skirt portion of the dress is straight, you can easily add extra length to the skirt and make a final decision on length at the end, taking it off the bottom. Just make sure to transfer the angled hemline when you trim so you can achieve the mitered corner in the instructions.
Also, the spaghetti straps and elastic at the shoulder can be cut long and adjusted once the dress is tried on. The most important lengthen / shorten line is the hip line. If you do add or subtract length to your skirt, be sure to do the same adjustment to the front facing and button shield. You also may want to add or subtract a button if you adjust the length.
Lengthen
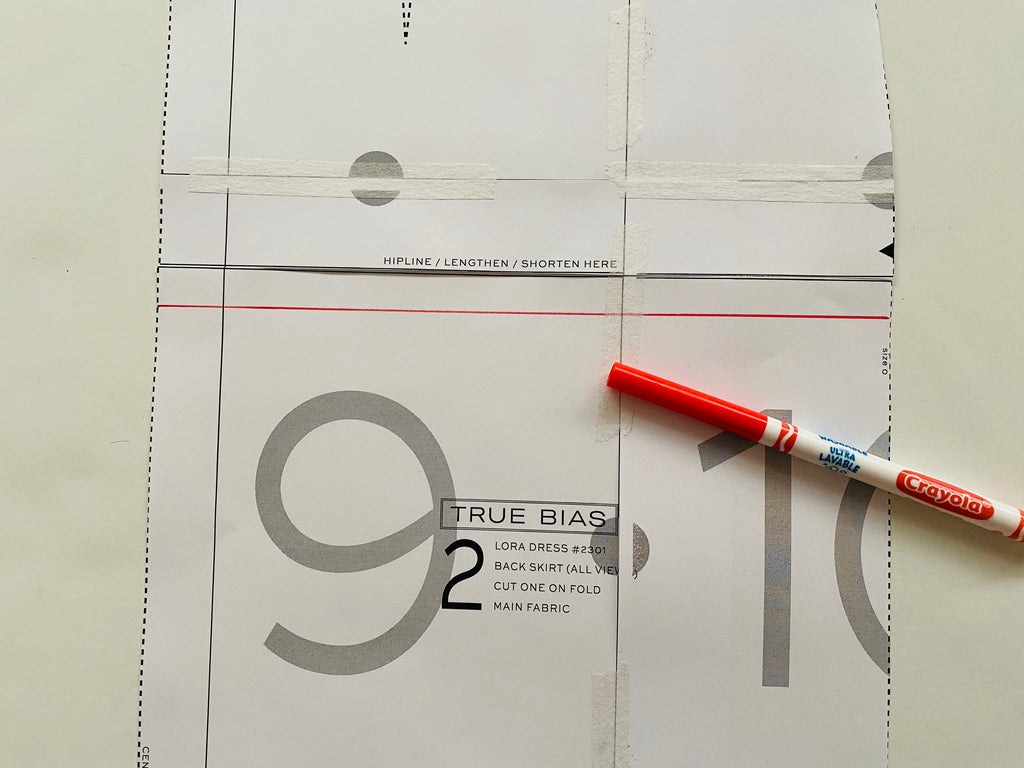
If you choose to lengthen your dress, start by getting a piece of paper and draw two parallel lines. They should be the distance apart that you want to add to that area of the dress. For me it is 1/2".

Cut your pattern piece in half along the lengthen / shorten line.

Tape each section of the pattern along the top and bottom of the lines you drew on the scrap piece of paper. The center front and center back lines should stay lined up. Tape.

Trim off any excess paper. Smooth any lines that may have gotten weird in the process.

Shorten
To shorten your pattern, start by drawing line below the lengthen / shorten line. The distance is the amount you want to shorten that area of the pattern. For me that is 1/2".

Cut along the lengthen / shorten line. Bring the top portion down and tape it along the line you drew. Keep the center front / back of the pattern pieces in line.


That is it. If the side seam got uneven at all you should smooth it out.
GRADING BETWEEN SIZES
If you are between sizes I generally recommend sizing up for this pattern. If your measurements land you in multiple sizes I definitely recommend grading between them. Because this pattern is nested, it should be pretty simple to grade between multiple sizes. My biggest recommendation is to use a highlighter to highlight your cut lines. When using multiple sizes it can get pretty confusing and easy to make a mistake when cutting.
The other trick to grading well is just to blend nicely. I am using a curved ruler here but you can also free hand it. Just make it as gradual as possible.


And that is it for our fitting post for the Lora dress. I know it's a lot of information, but I hope it gives you the confidence you need to jump in and get a good fit.