Welcome back for Day 3 of the
Lodo Dress Sewalong. I am super excited to tackle the neckline today. You can put aside your woven arm facing pieces and just grab your woven neckline facings along with your knit dress.
For all of the steps in todays sewalong you will be using a regular, non stretch stitch on your sewing machine. And just a reminder that all seam allowances are 3/8" unless otherwise stated.
Step 5 - With right sides touching, sew the shoulder seams of the front and back woven neck facings together. Press the seams open. No need to finish these seam allowances as they will not be exposed.

Turn the outside edges of the facing towards the wrong side by about 1/4" all around and press well. Steam helps a lot. One tip that I sometimes use is to run a line of stitching at 1/4" around the outside edge of the facing first. Then press along the stitching line. It just makes it a bit easier to get a crisp and even edge.

 Step 6 -
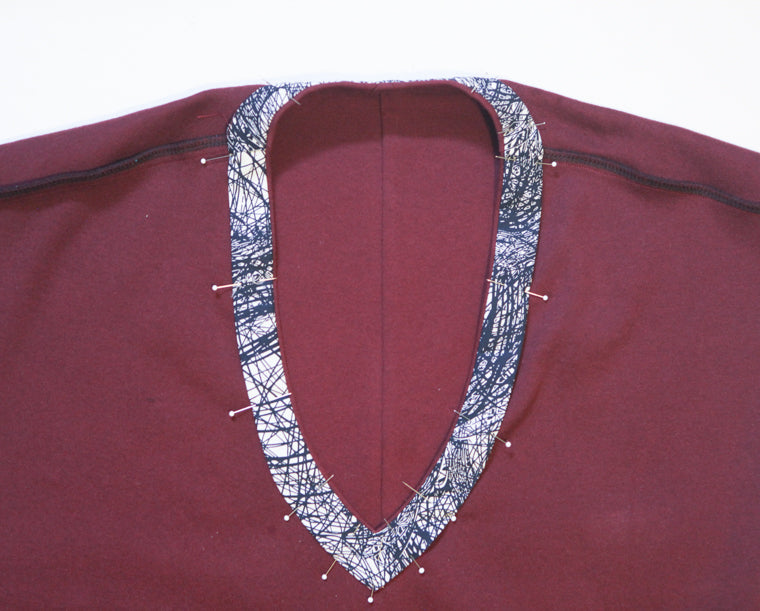
 With right sides touching, line up the necklines of the dress and facing and pin generously.
 Step 7 -
 Starting at Center Back, stitch around the inside edge of the neckline.

When you get to center front, leave your needle down, puck up your presser foot, and rotate to finish stitching up the other side of the neckline to finish at center back.


It's a good idea to shorten your stitch length for about an inch in either direction of the center front V. This will give that area extra strength and also help your be more precise in stitching your V. I usually lower the stitch length down to about 1.5.
Step 8 - Trim the seam allowance of the woven facing to about 1/4" to reduce bulk in that area.

Snip close to, but not thru the seam allowances of the V at center front. This will help you achieve a crisp V.

Continue clipping around the remainder of the neckline to help it turn easily and have a smooth finish.
 Step 9 -
 Pull the facing through the neckline and towards the wrong side of the dress. Pin and press so that the neckline seam is rolled slightly towards the inside of the dress to make it less visible on the right side of the garment. This is especially crucial if your facing does not match your knit fabric.
 Step 10 -
 Starting at center back, edgestitch along the folded edge of the facing about 1/8" away from the fold.

When you get to center front, leave your needle down, pick up your presser foot, and rotate to finish stitching up the other side of the neckline to finish at center back.

This stitching is where you really want to be careful an take your time. It is visible on the right side of your dress and will be distracting if it's uneven.


Give it a press and you are done for today! Come back tomorrow and we will finish up the whole dress.