Welcome back for day 2 of the Salida Skirt Sewalong. Today we are going to tackle the zipper. I know this can feel overwhelming to beginners so I created a video tutorial that will walk you step by step through the entire process. Once you break it down into small pieces, it's a lot easier to digest. If you decide to use the video, simply skip the rest of todays sewalong. If you prefer photos to a video, skip the following video and there is a traditional step by step sewalong below.
I would also like to add that the pattern pieces should also work for other zipper methods, so if you already have a method for sewing up a zipper that you prefer, feel free to use that one.
Step 6 - First you are going to want to trim the right front fly along the trim line as indicated on your pattern pieces. Sometimes this line can get a bit wonky when attaching the yoke. If it is not lining up straight, simply draw another line 1.25” from edge and trim that.
Apply left fly fusible interfacing to the wrong side of the assembled left front only as shown below.
Using your desired method, finish the seam allowances separately of both the left and right center front edges along the extensions and down to the hem. I know it can feel a little hard to finish the seam allowance right below the extention. Just do your best, realizing that this area will all be covered with your fly shield in future steps. Just make sure that you are not trimming your seam allowance as you are finishing it.
Step 7 - Fold back ½” on the right front skirt panel so it’s even with the raw edge below the extention, and press to create a guide line. Open back up. Fold back the left front skirt panel along the edge of the fusible interfacing, and press to create a guide line. Open back up.
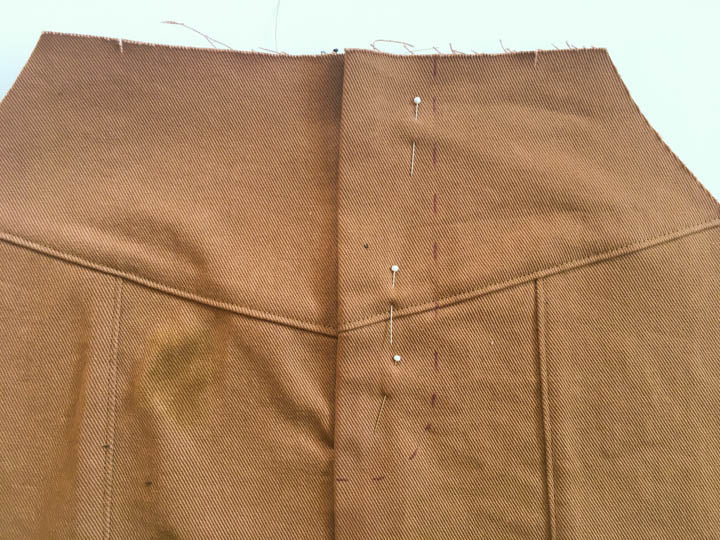
Step 8 - With right sides touching, pin the front skirt panels together, matching yoke seams, notches and dot. I like to start pinning at the dot as this is the trickiest part to line up and then continue pinning towards the hem.
Sew the center front seam up to the dot, and backstitch to secure.
Step 9 - Position your skirt so that the left front is facing up, and the right front is falling down and out of the way.
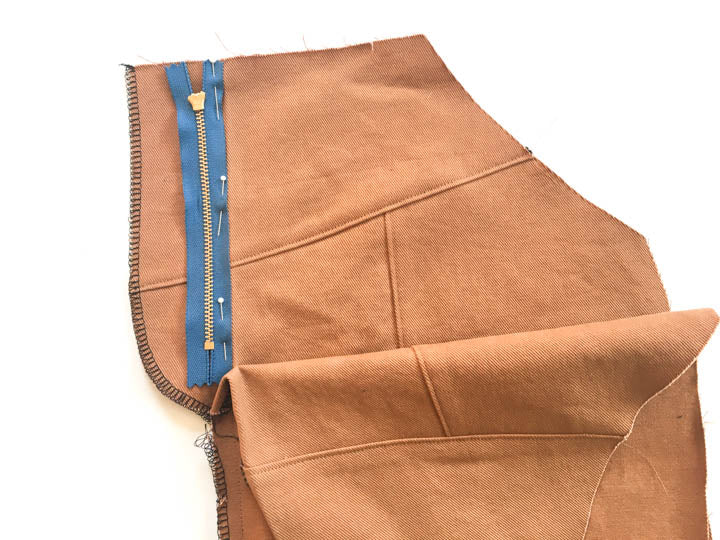
Place your zipper face down so that the right edge (when facing down) of the zipper tape is lined up with the fold you created as a guide line, and the top edge is flush with the top raw edge of the skirt. Pin along the right edge. (This is a great place to use zipper tape if you prefer.)
Step 10 - Using a zipper foot, stitch along the left side of the zipper teeth as pictured, backstitching at the lower end to secure. Because the zipper pull is a bit bulky, you will not be able to sew completely straight at the top. Don’t worry about this- this line of stitching is not visible on the outside of the skirt. If you force this line of stitching to be straight, it will push the zipper pull over and will therefore not stay hidden once the skirt is finished.
Remove pins along the zipper.
Step 11 - Turn the left fly extension to the inside of the skirt along the foldline that you pressed earlier. With the wrong side of the skirt facing up, pin in place.
Step 12 - With the right side of your skirt facing up, unzip your zipper. Place the folded right front edge over the zipper tape, aligning the fold with the zipper teeth. Pin in place.
Step 13 - Using a zipper foot, baste close to the folded edge to secure the zipper to the right front. Midway through basting, leave the needle down and pass the zipper pull under the presser foot to close the zipper. (You may need to temporarily pop off your zipper foot for this to be possible.) Continue basting, ending as close to the lower edge as possible. Note that you will not be able to get all of the way to the end since it is tucked into the left side of the skirt. Don't worry about this. Just get as far down as you can.
Zip up the fly to make sure that the yoke seams are aligned, everything is laying flat, and that the zipper is tucked neatly into the left side of the skirt and not visible. If there are any issues you should adjust them now while it is still only basted.
Press the whole center front seam allowance towards the front left skirt (when wearing).
Step 14 - Align the topstitching guide (pattern piece 17) with the left front opening edge, as pictured.
Using the paper pattern piece as your guide, mark the left fly stitching line on the outside of the skirt.
Make sure that the center front seam allowances are still pressed towards the left front skirt as shown in step 13. Topstitch the fly through all layers along the marked line. Topstitch again 1/4” inside the first line of stitching.
Starting at the edge of the fly topstitching and ending at the hem, topstitch the left front ⅛” inside the center front seam, catching the seam allowance underneath.
Step 15 - Fold the fly shield in half with right sides touching. Stitch the lower end at 1/2” seam allowance. Trim. Turn fly shield right side out and press. Finish the inner long edge of the fly shield with either a zig-zag stitch or a serger.
Step 16 - With the skirt facing up and the zipper open, place the fly shield under the right front opening edge. The finished edge of the fly shield should slightly cover the right zipper tape. The fly shield should extend past center front, as pictured. Pin in place.
It should look like this on the wrong side.
Step 17 - Using a zipper foot, topstitch the right front on top of the line of previous basting through all layers, catching the fly shield in the line of stitching. Keep the left front free as you sew. In order to sew close to the fold, midway through stitching, leave the needle down, and pass the zipper pull under the presser foot to close the zipper. Continue stitching, ending as close to the lower edge as possible, and backstitch. Remove basting stitches if visible.
Step 18 - Zip up the fly and make sure that everything is laying flat and lined up. To secure the fly, sew a small (about 1/2” long) bar tack through all layers (including fly shield) at the bottom of the inner curved stitching line (oops I accidentally sewed mine on the outer line), and another at an angle about an inch up along the outer curved stitching line, as pictured. This will help to reinforce the tension points of the zipper, while also securing the fly shield.
It should look like this on the wrong side.
And that is it for today. I hope that was not too hard. Let me know if you have any questions and come back again tomorrow for my sewing.
 Using your desired method, finish the seam allowances separately of both the left and right center front edges along the extensions and down to the hem. I know it can feel a little hard to finish the seam allowance right below the extention. Just do your best, realizing that this area will all be covered with your fly shield in future steps. Just make sure that you are not trimming your seam allowance as you are finishing it.
 Step 7 - Fold back ½” on the right front skirt panel so it’s even with the raw edge below the extention, and press to create a guide line. Open back up. Fold back the left front skirt panel along the edge of the fusible interfacing, and press to create a guide line. Open back up.
 Step 8 - With right sides touching, pin the front skirt panels together, matching yoke seams, notches and dot. I like to start pinning at the dot as this is the trickiest part to line up and then continue pinning towards the hem.
 Sew the center front seam up to the dot, and backstitch to secure.
 Step 9 - Position your skirt so that the left front is facing up, and the right front is falling down and out of the way.
 Place your zipper face down so that the right edge (when facing down) of the zipper tape is lined up with the fold you created as a guide line, and the top edge is flush with the top raw edge of the skirt. Pin along the right edge. (This is a great place to use zipper tape if you prefer.)
 Step 10 - Using a zipper foot, stitch along the left side of the zipper teeth as pictured, backstitching at the lower end to secure. Because the zipper pull is a bit bulky, you will not be able to sew completely straight at the top. Don’t worry about this- this line of stitching is not visible on the outside of the skirt. If you force this line of stitching to be straight, it will push the zipper pull over and will therefore not stay hidden once the skirt is finished.
 Remove pins along the zipper.
Step 11 - Turn the left fly extension to the inside of the skirt along the foldline that you pressed earlier. With the wrong side of the skirt facing up, pin in place.
Remove pins along the zipper.
Step 11 - Turn the left fly extension to the inside of the skirt along the foldline that you pressed earlier. With the wrong side of the skirt facing up, pin in place.
 Step 12 - With the right side of your skirt facing up, unzip your zipper. Place the folded right front edge over the zipper tape, aligning the fold with the zipper teeth. Pin in place.
 Step 13 - Using a zipper foot, baste close to the folded edge to secure the zipper to the right front. Midway through basting, leave the needle down and pass the zipper pull under the presser foot to close the zipper. (You may need to temporarily pop off your zipper foot for this to be possible.) Continue basting, ending as close to the lower edge as possible. Note that you will not be able to get all of the way to the end since it is tucked into the left side of the skirt. Don't worry about this. Just get as far down as you can.
 Zip up the fly to make sure that the yoke seams are aligned, everything is laying flat, and that the zipper is tucked neatly into the left side of the skirt and not visible. If there are any issues you should adjust them now while it is still only basted.
 Press the whole center front seam allowance towards the front left skirt (when wearing).
 Step 14 - Align the topstitching guide (pattern piece 17) with the left front opening edge, as pictured.
 Using the paper pattern piece as your guide, mark the left fly stitching line on the outside of the skirt.
 Make sure that the center front seam allowances are still pressed towards the left front skirt as shown in step 13. Topstitch the fly through all layers along the marked line. Topstitch again 1/4” inside the first line of stitching.
 Starting at the edge of the fly topstitching and ending at the hem, topstitch the left front ⅛” inside the center front seam, catching the seam allowance underneath.
 Step 15 - Fold the fly shield in half with right sides touching. Stitch the lower end at 1/2” seam allowance. Trim. Turn fly shield right side out and press. Finish the inner long edge of the fly shield with either a zig-zag stitch or a serger.
 Step 16 - With the skirt facing up and the zipper open, place the fly shield under the right front opening edge. The finished edge of the fly shield should slightly cover the right zipper tape. The fly shield should extend past center front, as pictured. Pin in place.
 It should look like this on the wrong side.
 Step 17 - Using a zipper foot, topstitch the right front on top of the line of previous basting through all layers, catching the fly shield in the line of stitching. Keep the left front free as you sew. In order to sew close to the fold, midway through stitching, leave the needle down, and pass the zipper pull under the presser foot to close the zipper. Continue stitching, ending as close to the lower edge as possible, and backstitch. Remove basting stitches if visible.
 Step 18 - Zip up the fly and make sure that everything is laying flat and lined up. To secure the fly, sew a small (about 1/2” long) bar tack through all layers (including fly shield) at the bottom of the inner curved stitching line (oops I accidentally sewed mine on the outer line), and another at an angle about an inch up along the outer curved stitching line, as pictured. This will help to reinforce the tension points of the zipper, while also securing the fly shield.
 It should look like this on the wrong side.
 And that is it for today. I hope that was not too hard. Let me know if you have any questions and come back again tomorrow for my sewing.