Like I mentioned before, I will not be doing a full sewalong for the
Mini Southport Dress. Most of the steps are the same or similar to those in the
adult sized Southport Dress so
check those out if you want a little more help.
I did, however, want to do this one tutorial for the armhole binding technique that I used. When creating the pattern for the
Mini Southport Dress it became clear to me that it was extremely difficult to attach the bias binding to the armholes in the round because the armhole curves were so tight on the smallest sizes. When looking for an alternate technique I found this one used on some of my daughter's ready to wear dresses. It makes it much easier to get a nice finish on your armholes. Because the bodice on this dress has quite a lot of ease it is the perfect solution. I would not, however, recommend using this technique on a more fitted garment as it does add a bit of extra bulk to the underarm seam that may be uncomfortable if close to the body.
The following steps coordinate with those in the instructions of the
Mini Southport Dress:
Step 9 - Before continuing, finish the seam allowance of the front and back side seams separately. I used my serger to do this, but you could also using pinking shears or zigzag stitch the allowances.

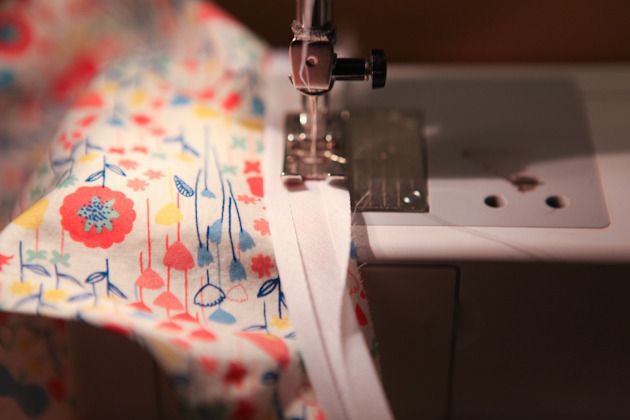
Get your bias tape again, and open one of the folded sides just like you did for the neckline. Starting at the underarm seam, with about 1” of bias tape hanging off the front side seam edge, pin the long, open edge of your bias tape around the armhole so that it is flush with the edge , right sides touching. Stitch at 1/4” seam allowance.
Here is how it looks once it's done. Notice how there is a tail about 1" long left over on the front armhole edge only.

Step 10 - Just like you did on the neckline, press the bias tape up and away from the bodice and over the seam allowance. Do this on a curved surface such as a tailors ham or rolled up towel to help support the curve of the armhole.

Understitch but stitching through the seam allowance and bias tape about 1/6" -1/8" inside of the bias tape.

Turn the bias tape to the inside of the bodice while rolling the seam slightly to the inside. Press on a curved surface. Steam is your friend here to help the bias tape make the curves without causing any puckering. Pin.

Edgestitch along the open side of the bias facing securing it to the armhole. Leave the 1” tail free on the bodice front.

Step 11 - With right sides together, pin the side seams. Stitch at 1/2" seam allowance.

Step 12 - Take the 1” tail of the bias tape left over on the front bodice seam allowance and fold it over the back seam allowance so that the end touches the stitch line on the back bodice. You may need to trim it to fit snugly.

Press this, along with the side seam allowances, towards the back and pin at the top.

Step 13 - On the right side of your bodice, stitch for about 3/4” down through all layers to secure the seam allowances and bias tape to the back bodice. Here is what the right side of the armhole should look like.

And here is what the inside should look like.

All done with the armholes. Give them a nice press and proceed to the next part of the instructions!

I hope you guys liked the tutorial and that it helped with any of you who wanted a visual for these steps. If you would like to purchase the Mini Southport Dress pdf sewing pattern you can do it
here. Also, the fabric that I used for this dress is some cotton lawn from Robert Kaufman which you can find
here
.